Before you start
The whole flow is three actions: authorize, publish, read the numbers. Prep list is short:
- A TikTok account you can log into (personal, Creator, Business — TikTok Shop is fine too).
- A clean VPN with an exit in your TikTok account's home country. Needed only for the one-time authorization, not for anything after.
- A video already sitting in Clipcat — either generated or uploaded. No footage yet? Spin one out from Viral Video Cloning or the AI TikTok Video Generator.
Think of it in two halves. Authorization goes through TikTok's official OAuth page and needs a clean, country-matched VPN once. Publishing and analytics run server-side against the official API, so your local network doesn't matter. "VPN" is a one-time thing, not a per-post cost.
Step 1 · Authorize a TikTok account
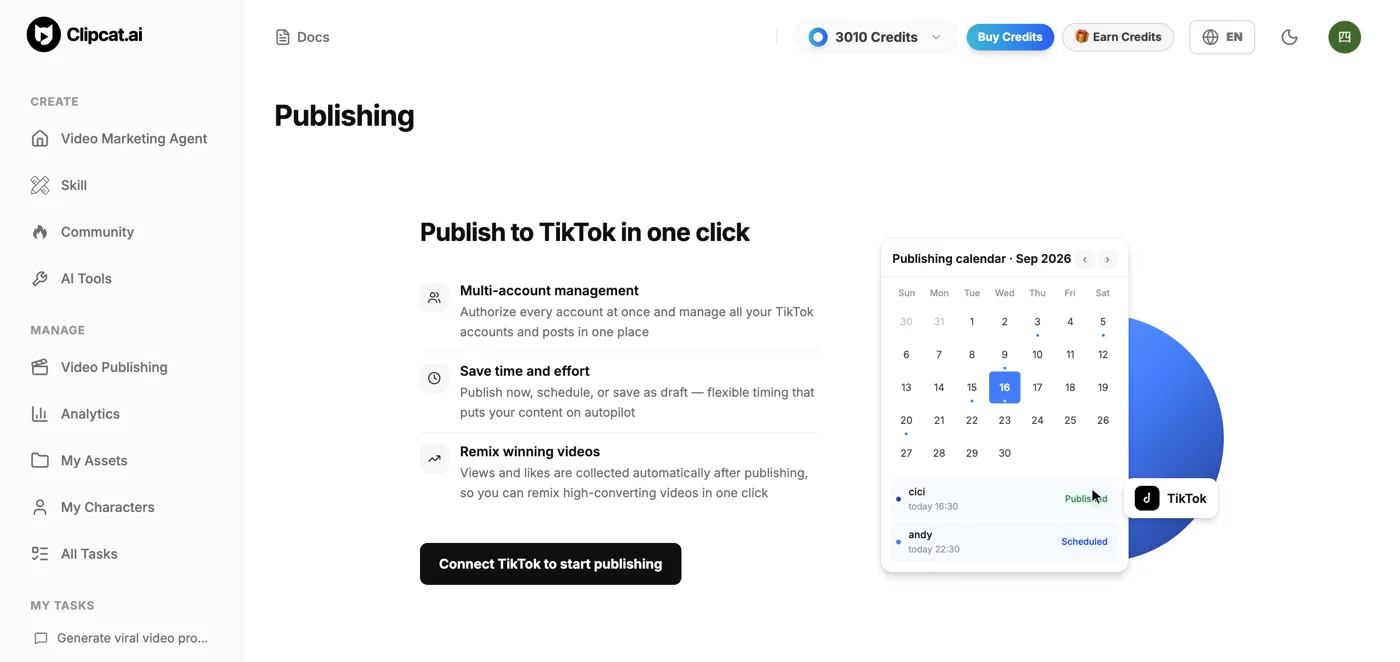
Open Video Publishing in the left nav and click "Connect TikTok to start publishing." A dialog opens with two authorization paths — pick whichever fits your setup.
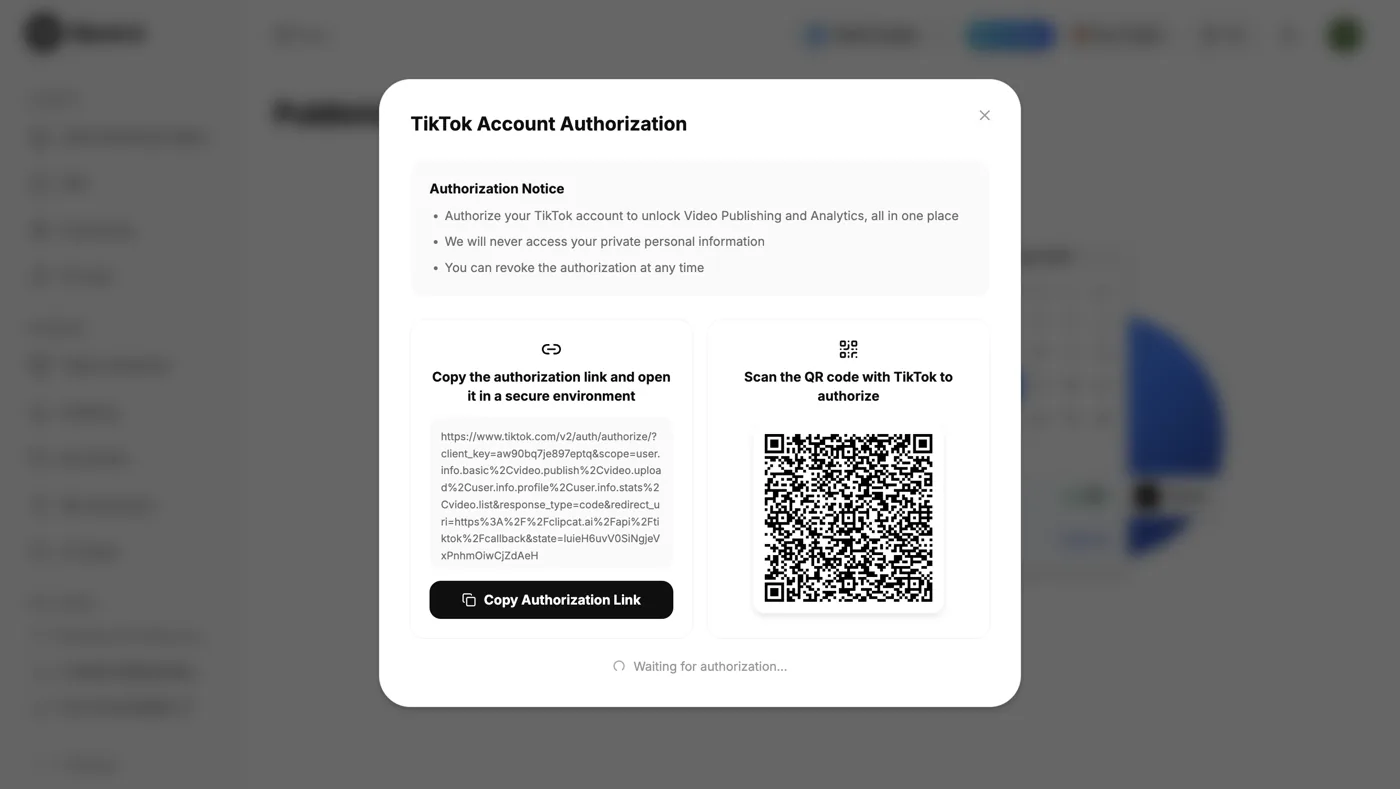
Path A: copy the auth link, open it in a browser
Click "Copy authorization link" and paste it into a browser that can reach TikTok normally (i.e. the machine where your country-matched VPN is already on). What loads is TikTok's own OAuth page — follow the on-screen prompts to log into your TikTok account and approve. The login itself is handled entirely by TikTok.
Path B: scan the QR from the TikTok app
If the TikTok app on your phone is already signed into the target account and can browse videos normally, just scan the QR code from the dialog and tap "Approve" on the in-app authorization screen. This is the most direct path — no desktop VPN dance needed.
Either path gets you the same result. Once authorization completes, one Clipcat account can hold and manage multiple authorized TikTok accounts — each managed independently, just pick the target account from the dropdown at publish time. From this point forward, publishing, scheduling, and analytics all happen inside Clipcat with no VPN required.
Step 2 · Publish videos to TikTok
With an account linked, head back to Video Publishing and hit "New post" — or pick a clip straight from your asset list. The post editor shows three panels: target account, cover + preview, and the details/settings panel on the right.
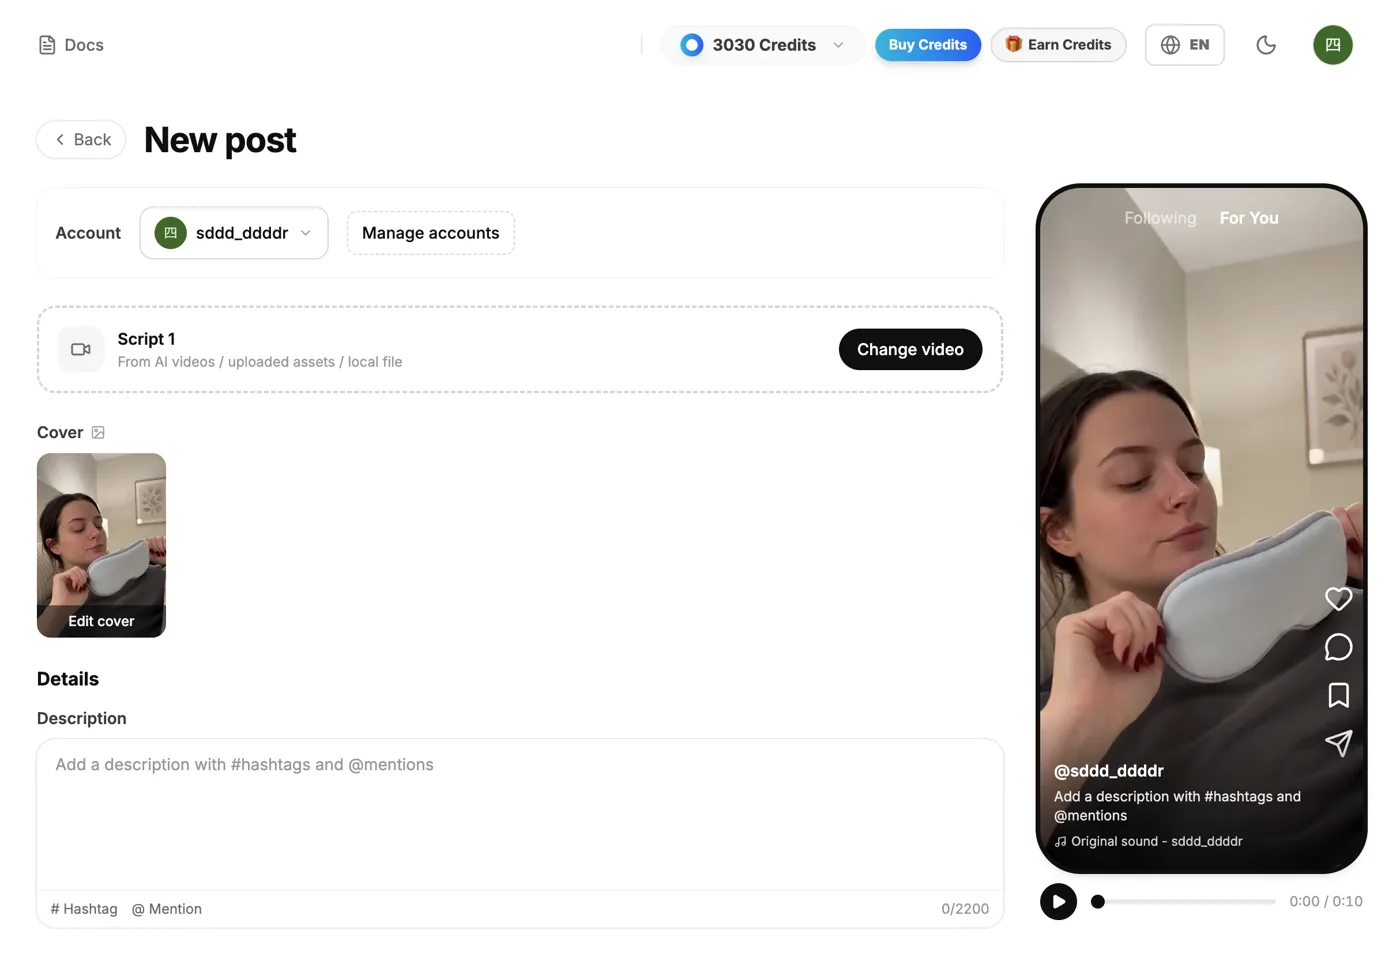
1Pick the publishing account, handle cover and caption
If you've linked more than one TikTok account, pick the target at the top. You can override the cover — upload your own or grab a frame from the video. Hit preview to watch the clip full-screen; running through the full video before publishing is a habit worth keeping, especially with AI-generated footage where a missed glitch can get the post flagged as low quality.
On the right, fill the caption, add hashtags, mention accounts — same shape as posting from the TikTok app. Steal keywords straight from the top-selling posts in your TikTok Shop category; don't try to invent them from scratch.
2Choose the post type: Post or Draft
The first item in the settings panel is Post type, and it's a binary — Post or Draft. This is the fork that decides the rest of the flow.
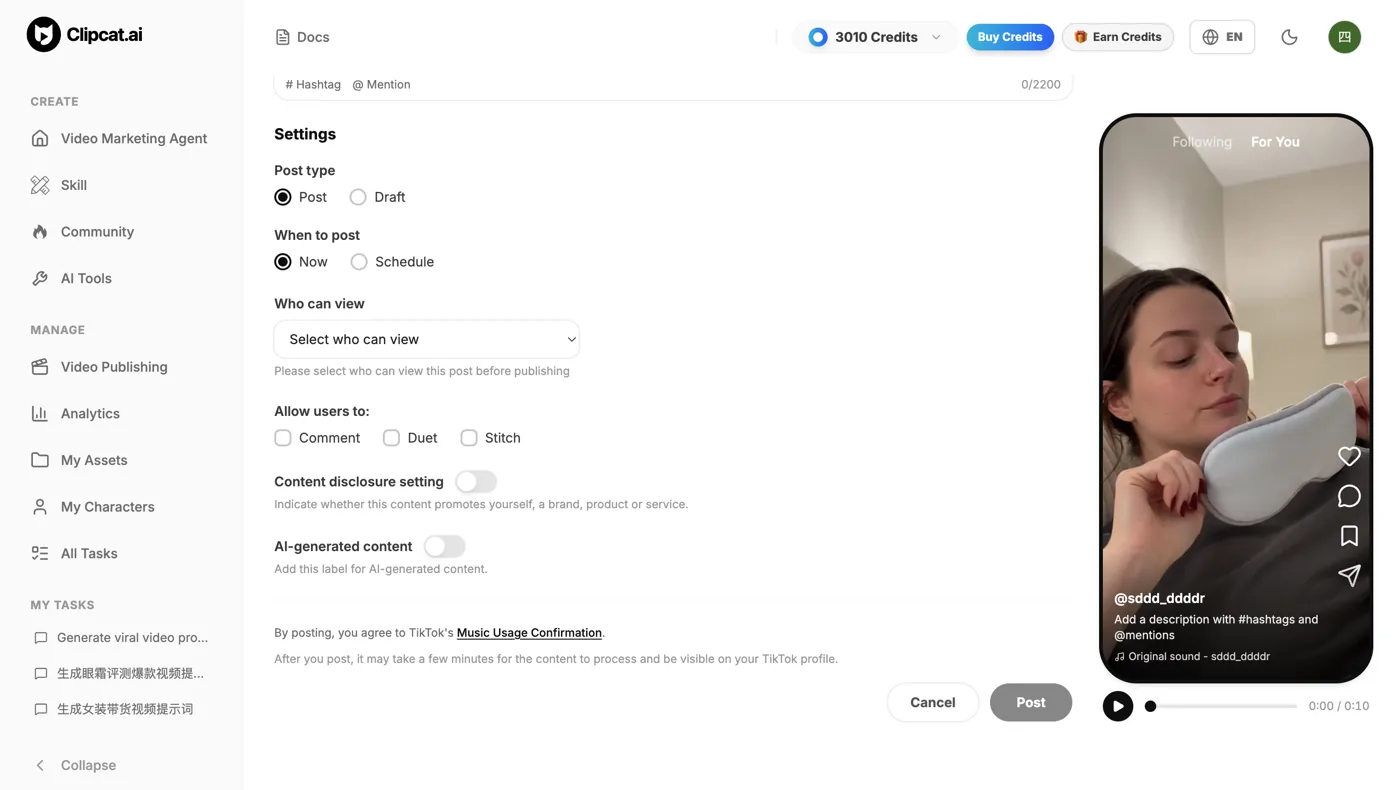
Pick "Post" — one-click publish through Clipcat
Once you pick Post, the "When to post" row appears with two choices:
- Now: hit publish at the bottom, Clipcat's server uploads the clip to your TikTok account immediately, and within a minute you'll see the post on the app's Home and Profile tabs.
- Schedule: pick a future date and time — down to the minute, from fifteen minutes out to ten days ahead. The system fires the upload at that moment automatically. When you're running a daily calendar across accounts, this is what lets you stagger posts across several slots without babysitting the schedule.
One-click publishing is currently for non-affiliate videos. Pure content, talking heads, unboxings, reviews, skits, tutorials — this is the fastest path for all of those.
Pick "Draft" — send to the TikTok app's drafts inbox
Pick Draft and the clip goes through the official API into your TikTok app's Drafts inbox (with a system notification so you can find it), then you open the app and finish the rest there — pick the product to tag, set commission, apply the shipping template, and hit publish inside the app.
Product-tagged (affiliate) videos take this path right now: make the video in Clipcat, ship it to Drafts, then open TikTok on your phone to attach the product and publish. Product tagging still sits behind TikTok Shop's own rules and doesn't have an outward-facing API yet, so this step can't be fully automated from Clipcat today. One-click publishing for product-tagged videos is on the next-phase roadmap.
3Set privacy and content toggles
Once post type and time are locked, keep scrolling in the same settings panel for the privacy and content section:
- Who can view: Public, Friends, Only me. Public for both commerce and content.
- Allow users to: Comment / Duet / Stitch as three separate toggles. Chasing engagement? Leave all three on. Serious brand account? Keep comments on but shut off Duet and Stitch to avoid off-brand remixes.
- Content disclosure setting: Promoting a third-party brand / your own brand — flag whichever actually applies. Compliance is not optional; getting this wrong will silently throttle reach.
- AI-generated content: Review TikTok's disclosure requirements for AI-generated content and decide for yourself whether to turn this toggle on based on your specific video.
When everything checks out, hit publish. "Now" uploads immediately; "Schedule" lands in the publishing calendar to fire at the set time; "Draft" gets pushed into the TikTok app's drafts. A toast on the top-right confirms and you're bounced to the published list.
Step 3 · Read the analytics of published videos
Posting without watching the numbers is posting into the void. Analytics lives in the left nav — open it and you see, per authorized account, the account snapshot (avatar, followers, total likes) plus performance data for every video on that account.
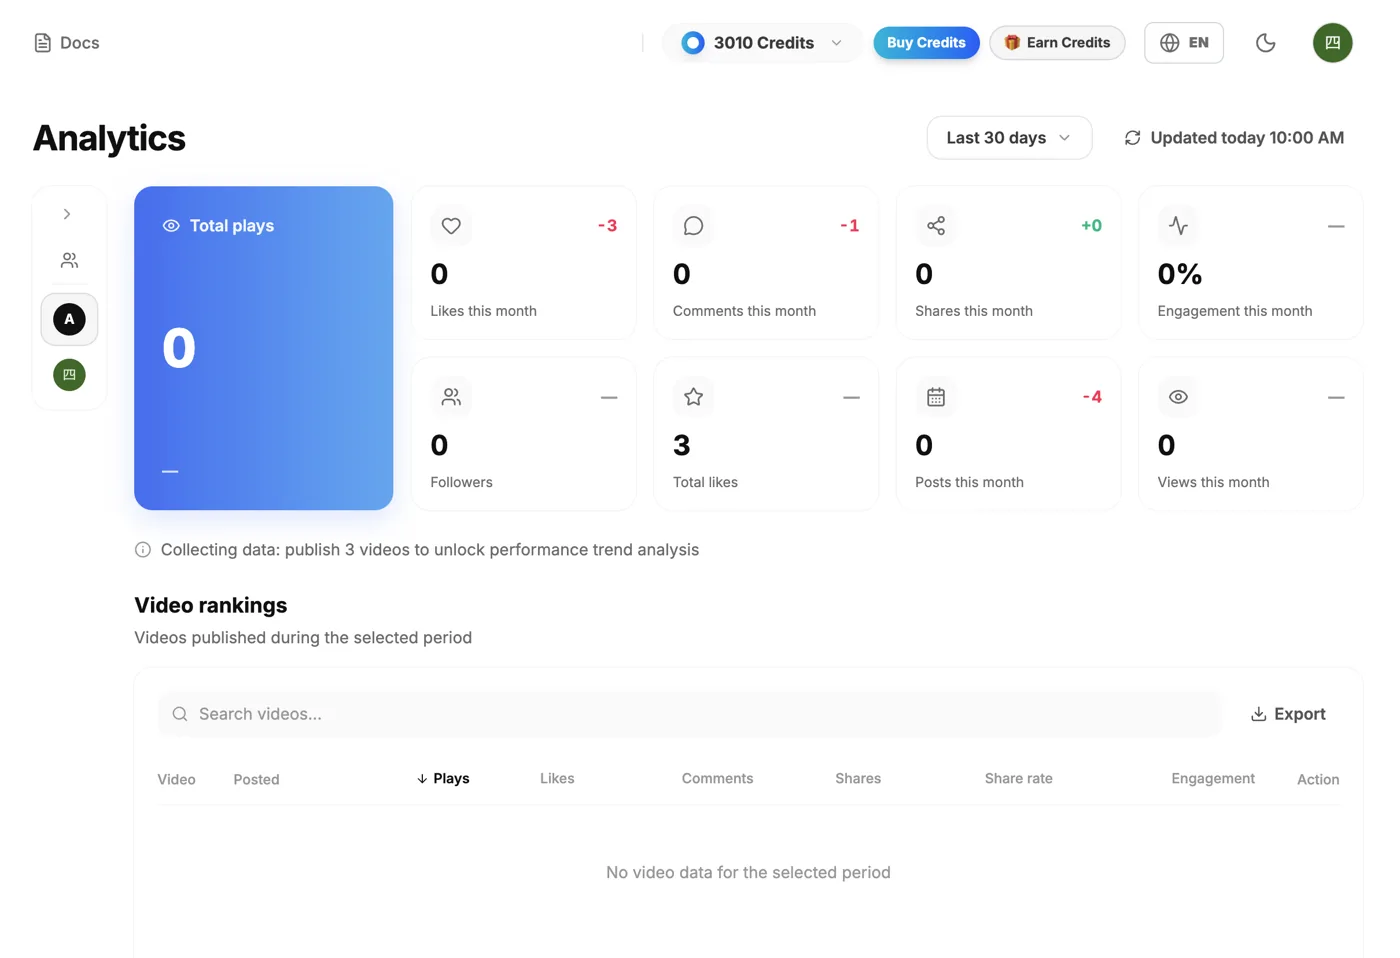
Metrics covered — anything TikTok exposes on the public side:
- Account level: total plays, likes this month, follower count, total videos.
- Video level: plays, likes, comments, shares, publish time, cover, caption for each post.
- Rankings: sort by plays or likes, spot the top performers at a glance.
Numbers refresh hourly; freshly published clips show up within about 30 minutes. When you spot a winner, hit "Remix" on the right of the row and jump straight into the four remix modes below — put the winning structure back to work on more of your SKUs.
Advanced 1 · Four ways to remix a winning post
Publishing is the start. Turning one winner into a batch of winners is the actual ceiling for commerce video. Every row on the published list has a "Remix" entry that gives you four cloning modes, ranging from near-copy to keep-only-the-hook.
1) Similar clone
Generates a brand-new video that mirrors the winner's overall structure — pacing, benefit order, shot logic all align with the original, while the visuals and lines get fresh takes. Best for sliding a proven structure across SKUs in the same category: one lipstick script hits, run Similar clone to push the same series across three more shades.
2) Character swap
For talking-head shots, keep the frame and script intact, swap the on-camera person for a similar AI avatar. When the original stars a human creator you can't run again, character swap is the shortest path. This is also how the avatar capability plugs into publishing — one saved avatar can carry dozens of remixes.
3) Keep only the winning hook
The first three seconds decide whether the winner wins; the rest is often standard. This mode keeps the opening frame and script (the part that stopped the scroll) and rewrites the middle and end with other beats from the same playbook. Great when the hook is locked and you want to A/B-test variations in the body.
4) Shot swap
Keep the winner's shot structure untouched, swap specific shots for near-lookalike alternatives — the two product close-ups become different angles, the lifestyle shot moves to a new setting. Same skeleton, fresh footage in a couple of slots. You end up with a batch that looks like family, not like clones.
Advanced 2 · Automate publishing inside Codex, Claude Code, WorkBuddy
Clipcat's publishing capability isn't locked to the web app. The Clipcat Skill/CLI already ships this to the major agents — do the account authorization once on the web, and afterwards a natural-language prompt inside Codex, Claude Code, WorkBuddy, or OpenClaw can trigger viral-leaderboard queries, cloning, video generation, direct TikTok publishing, and analytics pulls end-to-end.
Install the Skill in one line
macOS/Linux: in the Codex, Claude Code, or WorkBuddy chat, drop the natural-language cue first, then the command:
"Please install the Clipcat skill."
curl -fsSL https://clipcat.ai/cli | bashWindows: in PowerShell, same natural-language cue, then:
"Please install the Clipcat skill."
irm https://clipcat.ai/cli.ps1 | iexOnce installed, the Skill auto-attaches to whichever agent you're in — no manual wiring. When the agent needs to publish a video, it invokes Clipcat's capability under the hood; you just speak plain English.
Automations you can wire up right away
- Daily "find viral, remake, schedule" loop. Have Codex sweep the TikTok Shop top-20 in your market + category at 9am, filter out anything you've already cloned, fire Viral Video Cloning to generate three shot-variant remixes, and stagger them into morning, noon, evening slots that same day. You wake up, you check outcomes.
- Yesterday's numbers become today's clone brief. Have Claude Code pull last night's metrics at 22:00 across all accounts, identify the two highest-play videos, break their winning structure back down, and queue them as reference inputs for tomorrow's automated remix batch. Data → clone → publish, closed loop — the compounding flywheel starts spinning here.
- Multi-account management publishing. Clipcat lets you authorize multiple TikTok accounts at the same time. Hand the agent a proven winner and let it use Similar clone, Character swap, and Shot swap to spin off a handful of distinct-flavored variants, each scheduled to a different account under your umbrella. One winning structure fans out horizontally across accounts with zero copy-paste labor.
The point is simple: once publishing runs inside an agent, your team can spend the day on selection, numbers, and strategy — the repetitive labor is delegated.
On revoking authorization
Done letting Clipcat operate a given TikTok account? Head to Video Publishing, find the account tile, hit "Revoke." Clipcat immediately loses the ability to publish or pull data for that account, but every video you've already posted — plus its followers, comments, and likes — stays on your TikTok account untouched. When you want it back, run OAuth once more and the historical video list reloads.
FAQ
Will publishing videos through the Clipcat API get my TikTok account banned?
No. Clipcat uses TikTok's official Content Posting API. What you see during authorization is TikTok's own OAuth screen, and the granted scopes cover only video publishing, basic profile reads, and public video metrics — no password, DM, or follower-list access. Videos uploaded through the official API are treated the same as manually posted ones inside the app; they are not counted as third-party spam. What actually gets accounts sanctioned is the content itself — recycled uploads, re-encoded watermarks, brute-force volume — and that is independent of the pipe you use.
Do I need a VPN every time I publish through Clipcat?
Only once. Authorization goes through TikTok's official OAuth page, so if TikTok isn't directly accessible from where you live you need a clean VPN matching your TikTok account's home country to complete that step one time. After the token is issued, every subsequent publish, schedule, and analytics call is made server-side by Clipcat against the official API — your local network is out of the loop. So the real pattern is: authorize once, then run VPN-free.
Why does the guide insist on a clean VPN from the account's own country?
TikTok's account security stack cross-checks the IP geolocation against the account's home country. Authorizing through a noisy, heavily shared VPN can trigger risk controls, resulting in a failed authorization or, later, throttled reach on the account. Pick a clean or private VPN whose exit country matches your TikTok account's home region (US account → US node, JP account → JP node), get the one-time authorization through, and you never need it again.
Can affiliate / product-tagged videos be one-click published too?
Not in this release. One-click publishing currently covers non-affiliate short videos. For product-tagged posts (with linked SKUs, commissions, shipping templates) the pattern is: send the video from Clipcat to the TikTok Drafts inbox, then open the TikTok app, pick the product, confirm commission and shipping, and hit publish there. Product tagging still lives behind TikTok Shop's own rules and doesn't have an outward-facing API yet. One-click publishing for product-tagged videos is on the next-phase roadmap.
How precise is scheduling? Will the video actually go live at the exact time?
Down to the minute. You can pick any time from fifteen minutes out to ten days into the future. At the scheduled moment Clipcat's server calls the TikTok API and completes the upload — your laptop can be closed. Any failure gets flagged red in the publishing calendar with an error code. When you're managing a multi-account content calendar it lets you stagger the day's posts across a few slots per account instead of dumping them all at once.
How often does the analytics data refresh? Can I see DMs and follower demographics?
TikTok's official API only exposes public metrics — plays, likes, comments, shares, publish time. We refresh those once an hour, and freshly published videos show up on the list within roughly 30 minutes. DMs, follower demographics, and paid ad panels are not in the public scope; you'll need TikTok Studio or Ads Manager for those. For deeper day-over-day trends, install the Clipcat Skill and let Codex or Claude Code pull metrics on a schedule into your own sheet.
If I revoke the authorization, will my already-published videos get deleted?
No. Revoking only cuts Clipcat's future access to your TikTok account. Every video you've already posted, along with its followers, comments, and likes, stays on your TikTok account untouched. What changes after revoke: the analytics tab stops receiving new data for that account. Want it back? Re-run OAuth once and the historical video list reloads.
Can I use Clipcat's publishing capability from inside Codex or Claude Code?
Yes. Install the Clipcat Skill once — on macOS/Linux say "please install the Clipcat skill" inside Codex or Claude Code, then run curl -fsSL https://clipcat.ai/cli | bash; on Windows say the same sentence in PowerShell and run irm https://clipcat.ai/cli.ps1 | iex. Do the account authorization once from the web UI, and after that you can trigger viral leaderboard queries, cloning, video generation, direct TikTok publishing, and analytics pulls from natural-language prompts inside Codex, Claude Code, WorkBuddy, and other agents.
Wrap-up
Publishing in Clipcat comes down to three moves: authorize once, publish (direct or via drafts), read analytics. Two advanced tracks sit on top — remix winning posts four ways, and lift the whole loop into Codex, Claude Code, or WorkBuddy for hands-off runs. The compounding line: a viral post's payoff is no longer "that one video," it's "the merged GMV of every variant that structure will produce this week."
Further reading: How to Clone a Viral TikTok Video with Clipcat, Kalodata Alternative, Writing AI TikTok Shop Video Prompts, Full Clipcat Skill capability.